
Let’s tackle the biggest question first: how much does a living room extension actually cost? When trying to budget, the most helpful starting point is the kosten aanbouw woonkamer per m2 (cost per square meter). Based on industry data in the Netherlands, a standard, quality extension typically lands somewhere between €2,200 and €3,500 per square meter. So, to answer the common question, wat kost een uitbouw van 3 meter? For a 15-square-meter addition (e.g., 5m wide by 3m deep), your initial budget range would be approximately €33,000 to €52,500. Choose the best living room extension Netherlands.
Before you lock in that number, it’s crucial to know what a “standard” price includes. Most initial quotes are for a ‘casco’ build—meaning the basic windproof and watertight shell. This often excludes the finishing touches like plastering, painting, extensive electrical work, or high-end flooring. Knowing this distinction is the key to avoiding surprises and comparing contractor bids fairly.
To create a truly realistic budget, you must anticipate significant items that are almost always separate from a base quote. Plan for these three major potential costs:
- Foundation Piling (heien): If your home is on soft Dutch soil, deep foundation piles are often necessary and can add several thousand euros.
- Luxury Finishes & Relocations: Installing a designer kitchen, underfloor heating, or large glass sliding doors will be priced separately.
- Professional Fees: Remember to set aside funds for your architect, structural engineer, and any council permit fees.
Accounting for these elements is essential for a complete financial picture, particularly if you plan to uitbouw financieren met hypotheek (finance the extension with a mortgage).
Do I Need a Permit? The 4-Meter Rule Explained
One of the first—and biggest—questions you’ll have is whether you need official permission for your extension. In the Netherlands, this permission is called a vergunning (permit), and it’s granted by your local council (gemeente). The good news is that many common projects qualify for vergunningsvrij bouwen, which means you can build without needing to apply for a permit at all.
For a standard living room extension built onto the back of your house, there’s a crucial rule of thumb. If the new structure is no deeper than 4 meters from the original rear wall and meets other height and size criteria, you often don’t need a vergunning. This 4-meter zone is designed to let homeowners add significant space without going through a lengthy approval process, making it a very popular option for terraced and semi-detached houses.
So, why do permits exist for anything larger? A vergunning is required for bigger or more complex projects to ensure they are structurally sound and fit within your area’s zoning plan, or bestemmingsplan. Think of this as the “rulebook for your street.” An extension deeper than 4 meters, or one built onto the front or side of your house, almost always requires this official review and approval before any work can begin.
While the 4-meter rule is an excellent guideline, you should always get a definitive answer for your specific property. The official way to do this is through the government’s online portal, the Omgevingsloket. Here, you can perform a permit check by entering your address and project details. Once you’re clear on the permit requirements, the next question is often about the project’s duration.
How Long Will My House Be a Building Site? A Realistic Timeline
A common misconception is that the project clock starts only when the builders arrive. In reality, your extension timeline is split into two distinct parts: the planning phase and the construction phase. The planning, which involves creating a solid stappenplan huis uitbouwen (step-by-step plan for extending your house), often takes much longer than the actual building work itself.
This crucial preparation stage can last anywhere from two to six months. If your project requires a permit, expect this phase to be on the longer end as you await council approval. Once you’ve finalized your plans and are ready for the aannemer zoeken voor aanbouw (search for a builder), the on-site construction itself is usually much faster. For a standard extension, this typically takes between six and twelve weeks of actual building.
If the thought of your garden becoming a building site for months is daunting, you should explore prefabricated options. One of the biggest prefab uitbouw woonkamer voordelen (benefits of a prefab living room extension) is speed. Because the structure is built off-site in a factory, it can often be installed in just a few days, dramatically reducing noise and disruption at home. Deciding which path is right for you is a key step you’ll take when you begin to assemble your dream team.
Architect or Builder First? How to Assemble Your Dream Team
One of the first big questions in any stappenplan huis uitbouwen (step-by-step plan for extending your house) is deciding who to call first. It can feel like a chicken-and-egg problem, but the answer depends on your project’s needs. The two key players you’ll work with are the architect, who designs the space, and the aannemer (builder), who constructs it. Knowing their distinct roles is the first step to building your team.
An architect acts as your creative partner, translating your wishlist for more space and light into a feasible design. More importantly, they create the official drawings and calculations that the council requires for a permit application. If your vision for an extension is larger than the standard permit-free dimensions, an architect’s involvement isn’t just helpful—it’s essential for getting the legal go-ahead to even begin.
The aannemer (builder), on the other hand, is the hands-on expert who brings the plan to life. This leads to a simple rule of thumb: if you know you need a permit, always start with an architect. If your project is small enough to be permit-free, you can often go directly to a builder with your ideas to begin the process of aannemer zoeken voor aanbouw (searching for a builder for an extension).
Ultimately, the document that connects everyone is the bouwtekening (building drawing). This isn’t just a simple sketch; it’s the detailed blueprint for your project. Choosing to have a professional bouwtekening voor aanbouw laten maken ensures you get accurate quotes from builders and provides the council with exactly what they need for approval. With the technical plan set, you can turn to the exciting design choices that will define your new space.
Brick, Wood, or Glass? Choosing the Right Style for Your Home
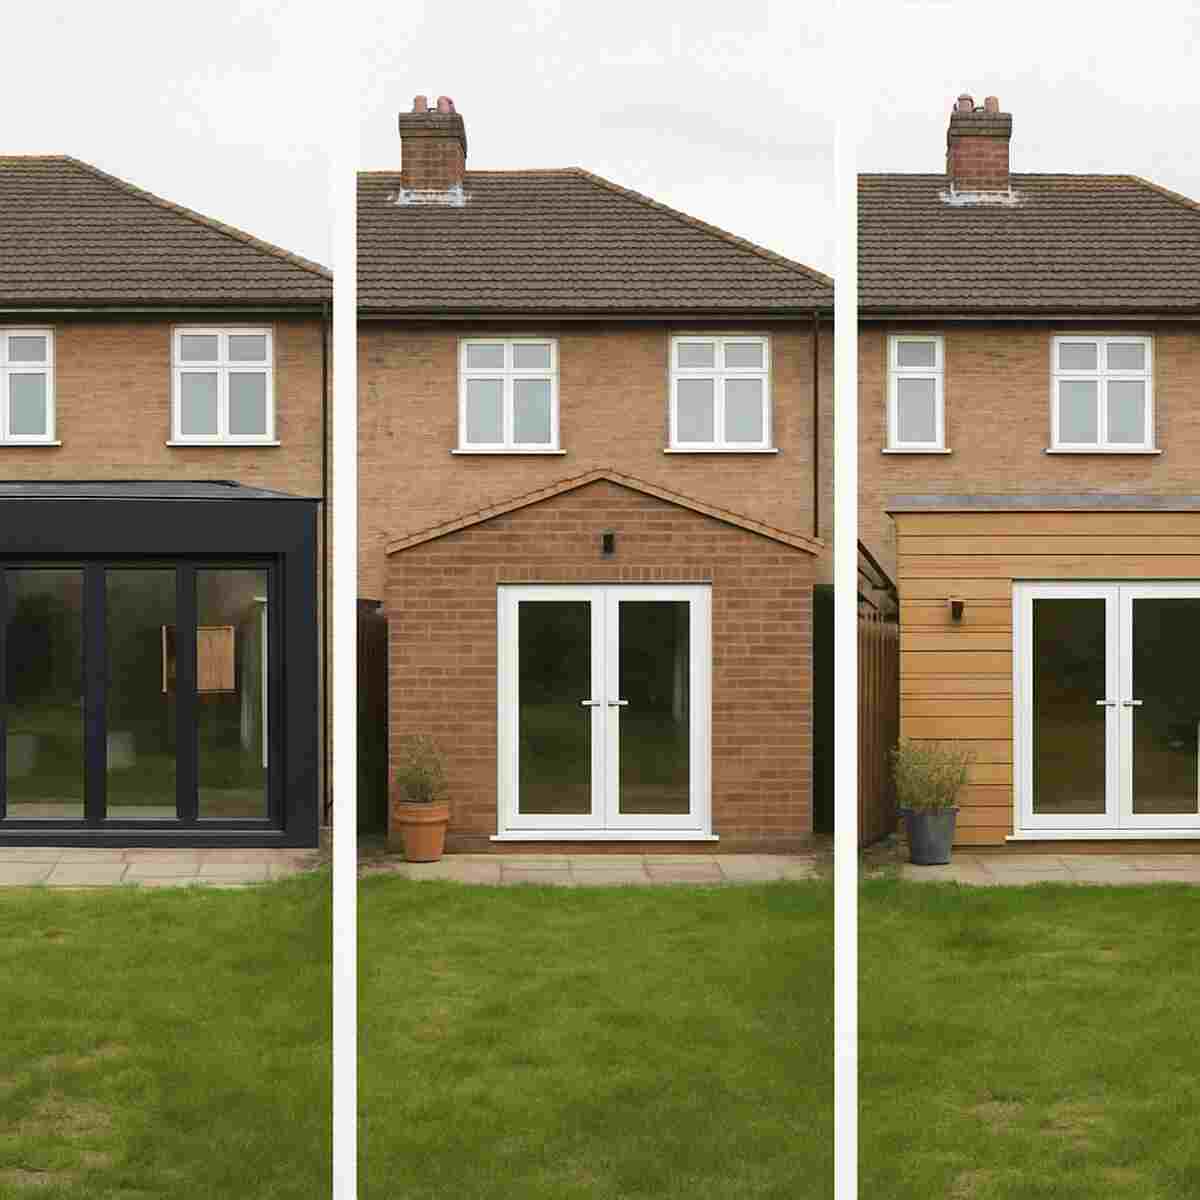
With the technical plans underway, you can focus on one of the most exciting parts: defining the style of your new space. The materials you choose will have the biggest impact on the final look and feel, both inside and out. The discussion often comes down to a choice between three popular approaches, creating a thoughtful houten aanbouw versus stenen aanbouw (wooden vs. brick extension) debate, with glass as a modern contender. Each material brings its own character to your home.
For a seamless look that makes the extension feel as if it were always there, a stenen aanbouw (brick extension) that matches your home’s existing brickwork is a timeless choice, especially for classic Dutch houses. In contrast, a houten aanbouw (wooden extension) can create a beautiful, warm contrast, adding a natural and sustainable element. If maximizing daylight is your absolute top priority, then a moderne uitbouw met glazen pui (modern extension with a glass facade) is unmatched, effectively blurring the line between your living room and garden.
Your decision isn’t just about aesthetics; it also involves practical considerations like long-term maintenance. Brick is famously durable and low-effort, while wood requires periodic care to keep it looking its best. Your material selection is also closely linked to interior design trends that favour open, light-filled living. Ultimately, the materials you choose can even influence the construction method and how quickly your project is completed, which brings up another important option to consider.
The Speed Advantage: Is a Prefabricated Extension Right for You?
Speaking of construction methods, there’s a modern approach that can dramatically change the timeline of your project: the prefabricated extension, or prefab uitbouw. Instead of building your extension brick by brick in your garden over several weeks, the main structure is built to your specifications in a factory. Think of it arriving at your home nearly complete, ready to be installed and finished in just a few days. This process offers a completely different rhythm to your renovation.
The main prefab uitbouw woonkamer voordelen (advantages of a prefab living room extension) are speed and predictability. Because the bulk of the work happens indoors, your project is protected from the infamous Dutch weather, virtually eliminating rain delays. For you, this means the most disruptive phase—the on-site construction—is condensed from many weeks into a much shorter period. This translates to far less noise, dust, and disruption to your daily life, a significant bonus for any family.
This method is an excellent choice for creating a modern living room, particularly for standard-sized extensions on properties with good rear access. It’s a crucial point in any stappenplan huis uitbouwen (step-by-step plan for extending a house) to note that a crane is needed to lift the unit into place. If your home has a clear path to the back, prefab could be a perfect fit. Whether you opt for prefab or traditional, the next question becomes what kind of space you’re actually creating: a fully insulated room or a seasonal conservatory?
Extension or Conservatory? Why Aanbouw vs. Serre Matters for Year-Round Use
As you plan for more space, one of the first big decisions is what kind of space it will be. This is where understanding the aanbouw of serre verschil (difference between an extension and a conservatory) becomes critical. While both connect your home to the garden, they serve very different purposes and have different implications for your daily life and budget. The choice you make here will define whether you’re adding a seasonal sunroom or a permanent, year-round living area.
A true, fully-insulated extension in the Netherlands is called an aanbouw. Think of this as a permanent, high-quality addition to your home’s structure, built with the same level of insulation and heating as the main house. Because it functions as a genuine part of your home, you can completely remove the original rear wall, creating one large, seamless living area. This is the best way to achieve meer ruimte in huis creëren (creating more space in the house) and results in a significant waardevermeerdering huis door uitbouw (increase in house value through extension) because it adds true, usable square footage.
In contrast, a serre is a conservatory or sunroom, constructed mostly of glass with much less insulation. While fantastic for enjoying a sunny spring day, it’s not designed to be efficiently heated during the cold Dutch winters. For this reason, you almost always have to keep the original doors or wall between the house and the serre to prevent heat loss. The choice is clear: if you want a cozy, integrated part of your living room that you can use all year, you need an aanbouw. If you want a beautiful, sheltered spot to enjoy the outdoors from during milder weather, a serre might be enough.
Beyond Just Adding a Box: How to Maximize Light and Flow
Adding a few meters to your living room is great, but it can create a new problem: a dark, gloomy patch in the middle of your home where daylight no longer reaches. A popular and highly effective solution for this is a long, elegant skylight known as a lichtstraat (literally, a ‘light street’). By strategically placing this over the original part of your living room—just before the extension begins—you can flood the entire depth of the room with natural light. This is one of the best methods for lichtinval woonkamer verbeteren (improving light in the living room) and preventing that dreaded cave-like effect.
Smart design goes beyond just light; it’s about creating a truly usable modern living room. For effective space optimization, consider these interior details early in the process:
- Choose doors for your view. Large sliding doors offer an unobstructed panorama with fewer vertical lines, while bifold doors can create a wider, more dramatic opening to the garden but have more visual clutter when closed.
- Plan your furniture first. Decide where your sofa, dining table, and TV will go before finalizing the electrical plan. This ensures outlets and light fixtures are exactly where you need them.
These design details are what elevate a standard extension into a seamless, thoughtfully designed part of your home, blending interior design trends with daily function. But before any of this can be built, it needs a solid foundation. This is especially important in the Netherlands, where the ground itself often presents a unique challenge.
Building on Soft Ground: Why You Might Need Heien (Piling)
A beautiful design deserves a foundation that lasts a lifetime. In the Netherlands, this often means confronting a unique challenge: soft soil. Much of the country is built on clay, peat, and sand, which can be unstable. Adding the immense weight of a new extension without proper support can cause it to sink over the years, creating cracks and structural damage. This is why many projects require a process called heien (piling) to create an unshakeable base.
The process itself involves driving long, concrete or wooden posts, known as heipalen (foundation piles), deep into the earth until they reach a solid, stable layer of sand far below the surface. Think of them as stilts that transfer the entire weight of your extension past the soft topsoil and onto solid ground. Crucially, your builder doesn’t make this call. As part of a proper stappenplan huis uitbouwen (house extension plan), a structural engineer must analyze your soil and create a technical report that dictates if piles are needed, and exactly how many.
This stability, however, comes at a price and is a major factor in the total kosten aanbouw woonkamer (cost of a living room extension). Piling is a specialized job that can easily add €5,000 to €10,000 or more to your budget. While it’s a significant upfront expense, it is essential for the safety and longevity of your home. Accounting for major costs like this early on is key to planning your finances, which often involves exploring how your Dutch mortgage can help fund the project.
How to Pay for Your Dream Space: Using Your Dutch Mortgage
Seeing the potential kosten aanbouw woonkamer (cost of a living room extension), especially after considering major work like piling, can feel daunting. Thankfully, you often don’t need to have all the cash saved up. One of the most common ways to uitbouw financieren met hypotheek (finance an extension with a mortgage) is by increasing your existing home loan or refinancing to cover the construction costs. This is a well-established process that Dutch banks are very familiar with.
Rather than giving you a lump sum of cash, the lender will typically place the approved funds into a special account called a bouwdepot (construction deposit). Think of it as a dedicated pot of money for your renovation, managed by the bank. As you receive invoices from your architect or builder, you submit them to the bank, which then pays the bills directly from this deposit. This system ensures that the loan is used exactly for its intended purpose: building your extension.
The key to unlocking this financing lies in the future value of your home. A bank is willing to lend more because they know a well-built extension leads to a waardevermeerdering huis door uitbouw—an increase in your property’s value. To confirm this, they will require an official valuation from a taxateur (appraiser). This expert assesses your architectural plans and calculates what your home will be worth after the extension is complete, giving the bank the security it needs to approve the higher mortgage.
Before you start commissioning designs, your first practical step should be to speak with a mortgage advisor (hypotheekadviseur). They can analyze your financial situation, the estimated project costs, and the likely increase in home value to provide a clear picture of your borrowing capacity. With this solid financial understanding, you can confidently move forward with your project.
Your Next Steps: From Dream to Detailed Plan
What once felt like a huge, complicated project—creating more space in your home (meer ruimte in huis creëren)—is now a clear path forward. You’re no longer just dreaming of a bigger living room; you now understand the three pillars that turn that dream into a real plan: your budget, the permit rules, and your professional team. This knowledge gives you control over the process for your living room extension in the Netherlands.
Ready to move from planning to action? Here is a simple stappenplan huis uitbouwen you can complete today:
- Quick Check: Walk into your garden and measure its depth. See if your idea fits within the 4-meter, permit-free rule to understand your starting point.
- Rough Budget: Use an online calculator with a guide rate of ~€2,500 per square meter to get a first, ballpark figure for your desired size.
- Initial Research: Find two local architects or design-and-build firms online. Don’t contact them yet—just look at their past projects to see what style you like.
By taking these first concrete steps, you shift from being a homeowner with a space problem to a project leader with a plan. That future, light-filled living room flowing into your garden is no longer a distant wish, but the start of your home’s next exciting chapter.